I had servo jittering at startup before on Arduino. The startup of the Arduino somehow creates some PWM signals. I added a small relay to only power the Servo 1s after the Arduino has started. That is when the jitters stop.
Not sure if you noticed but those motors are Used and are from coffee machines… On the bright side, when you ride in the mornings the coffee will smell great 
Being serious, I did order the same type of pump to run off my BEC a few months ago. I didn’t think the thing was coming so I redesigned water system to use duct water pressure for water. The finally arrived 4 days ago after waiting 60+ days, quality is actually nice (weight and feel) I’m not using it though.
Out testing with our friends
6 Likes
Hi Guys
Ive been watching your progress with great interest
You are doing a great job
I am interested in your remote controller
Will you release stl files and parts lists
It would be very much appreciated
Thanks Nick
1 Like
We can share stl and part lists. Unfortunately the implementation of code and hardware is tricky to get to work properly, if not assembled/debugged correctly it may cause dangerous situations.
So we are currently not sure if it’s a good idea to publish the code. The stls and parts lists will however be a good start.
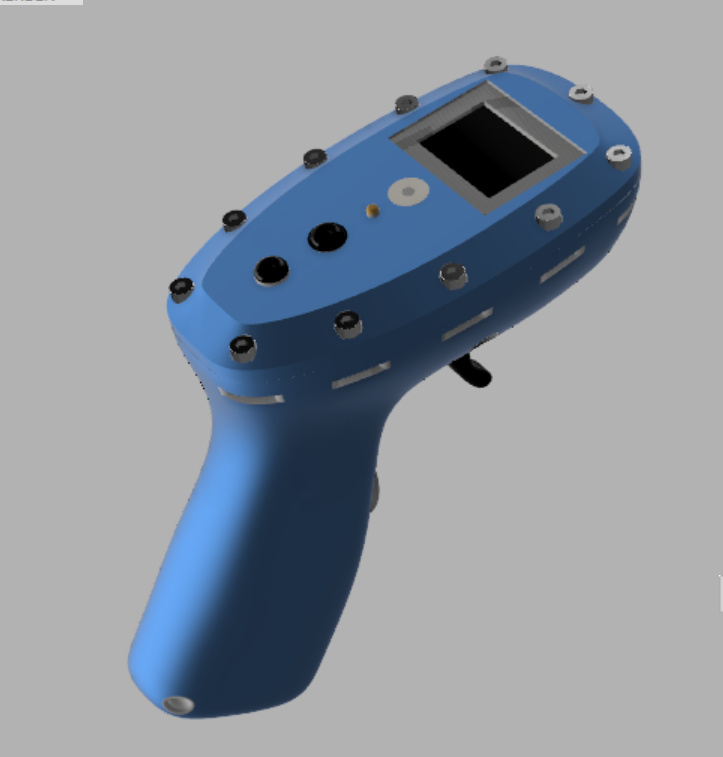
V2 remote with Oled display, and several other fun functions. acceleration curves, safety ++ will start 3D printing when I get my hands on more PLA for the printer: P
And hopefully it floats, 11xM3 bolts and nuts might be a slight overkill. Also it uses 3 super heavy stainless IP68 momentary switches… and one 56grams 18650 cell… a quick estimate from Solidworks says it might just work, but barely. Need to find lighter waterproof components for next version.
but overall, it is a nice platform for further testing, the lid can easily be swapped out. Only need to desolder 4 wires. And the walls are made extra thick to be as durable as PLA is… Need to do some SLS soon.
4 Likes
For what do you need all these nut spacers? Difficult to print and painful to use. Why not just use a metric thread like M3 or M4 inside the plastic?
Threading PLA plastic is not a durable solution, but it might work if you use long screws. I want high contact pressure on the O-ring between the lid and the controller. I find no problem printing and using “nutspacers” in my case they are the way to go when printing with PLA. But they have some drawbacks if not designed correctly, they can make high stress concentration on one layers resulting in cracks. Threads on the other hand are much better in distributing forces/stress evenly. But not durably eunuch in PLA, at least that is my experience.
heat set threaded inserts might work!
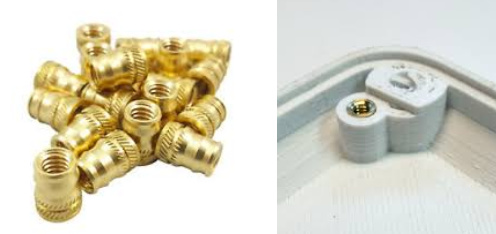
you use a soldering iron to add them, not yet tested, but ordered some now.
The remote looks really cool. Possible to get a 1st set of STL-Files of the remote?
3 Likes
I had some good experience when e.g. printing for M3 i print a hole with 2.5mm, than i redrill it with 2.5 and than use the tap for blind hole. But i think it is worn out if you assemble it too often and you need to limit the torque. I am keen on your experience with these inserts.
Someone described that its possible to stop the print and put some magnets inside, maybe this could be done with nuts as well. Than proceed with the print without overhangs.
…
I checked out the last solution and it works well after some calibration. Now i test a M3 nut printed inside a PLA cube of 14x14x15mm with a 10kg weight for long term.
1 Like
Soldering iron technique 101
2 Likes
Hi guys
any Stl files and full parts list yet
thanks nick
1 Like
Hi @Hiorth and great remote!
After using RF24 modules I’m now trying to use Bluetooth. To be specific the BLE standard. Hardware is a ADAFRUIT FEATHER NRF52 BLUEFRUIT LE board Adafruit Feather nRF52 Bluefruit LE [nRF52832] : ID 3406 : $24.95 : Adafruit Industries, Unique & fun DIY electronics and kits
I understand that your remote uses bluetooth too. Are you using “classic Bluetooth” or the BLE standard?
Maybe you can help with the bluetooth standard - which is a little confusing to me.
the problem is: I could make it work with a UART comunication between a board in “peripheral-Mode” and one in “central-mode”. But this seems not to be the intended approach of the UART comunication for streaming data like the throttle value in the BLE standard.
After reading this https://www.arduino.cc/en/Reference/CurieBLE -
I think that “notify” or “indicate” is the right way for streaming Data.
But I don’t have an example how to implement it and make sure that the receiver is only listening to my sender etc.
It would be great if you could share the code or a snipped of the code. This would be very helpfull
![]()
1 Like
Its coming.  just need to find the correct files and do some description.
We used Bluetooth 3.0 (not BLE) on the current one. The new one (with screen) will be BLE, still some things we need to figure out before it’s fully functional.
Magic carpet ride, sea edition
24 Likes
SIR,
you are crazy Big props ! Awesome footage!
1 Like
Hey your tracker says avg. speed 11,43km/h is that true? only moving speed or did it count stops as well? That would be really slow? Thought your avg. riding speed is about double that value…
We started the tracker inside the house. That’s why it’s so low average speed. It tracked some walking as well. Avg speed riding is 20km/h +
@Hiorth How has your remote been? Are you able to please share your STL files for the remote? I have all electronics working but haven’t been able to design a nice remote casing like yours.
2 Likes